Showing posts with label Food. Show all posts

Tuesday, December 20, 2016

5 Cooking tips for quick and no-fuss meals (when the babysitters are away)

December is usually the time when I clear my leave, so I can spend more time with the kids. We didn’t plan any long extended trip this year, just a short getaway to Malacca. The rest of the time, I sent EV and AA for inline skating and Mandarin speech & drama lessons at community centres, where such lessons are priced more economically. 

This is also usually the time when the usual babysitters who look after EV and AA while I’m at work take their break. So for the last couple of weeks, I’ve been solo parenting throughout the day, until DaddySay returns home from work in the early to late evening. 

I must say that I enjoy this hectic experience, of being able to be with the kids the whole day, caring for them, cooking for them, guiding them in their work and play, guiding them in little ways to be independent, and do the housework.

Here, I’d like to share some cooking tips, which I felt have been helpful.

Plan ahead and get the ingredients early
I try to make sure that think ahead and plan what to cook, at least one day before. I’d check that I have the necessary ingredients. If I don’t, I’d bring the kids with me to the nearby wet market, or plan a lunch date with the kids to the nearest mall to dine and visit the supermarket. 

Sometimes, I try to use the same ingredient for two meals. For example, I used a 600g piece of pork loin for two meals. Half of it, I sliced and stir fried with vegetables for dinner, and the other half, I cut into cubes for fried rice the next day. I prepared everything beforehand, and so on the day when I cooked fried rice, it was extremely convenient as I only needed to take the marinated cut meat out of the fridge, and then I could begin cooking.

Two meats  TM

Defrost frozen meat the night before
Planning early also means that if frozen meat is being used, then it can be taken out the night before and set to defrost in room temperature. Then I can get up the next morning before the kids awake, and start the preparations early.

Prepare the ingredients and marinate the meat early
I usually cut and marinate the meat in the morning after the meat has defrosted. Or if I had bought the meat the day before, then I would have prepared the meat the night before. This allows the meat to be better marinated, and, I hope, better tasting once I cook it. :)

I also try to get vegetables that are easy and quick to prepare, such as broccoli, cauliflower, chinese cabbage and so on. I would cut them early too, and leave them aside. So when cooking time arrives, I just need to toss them into the wok. The only ingredient that I usually prepare just before cooking is garlic, which I prefer to dice finely.

Opt for quick cooking methods such as stir frying, steaming, braising and oven roasting
I didn’t try anything adventurous during this period. It is hard to, I guess, when I’m the only one minding the kids. I needed to use quick cooking methods so that I can attend to them immediately if the need arises. 

Get the kids to help
This is definitely a great idea. It inculcates in them a sense of duty, responsibility and empathy for the one who is cooking, but it also helps in their finger dexterity. It’s simply another form of play for them. Who doesn’t like to play with food? 

Preparing  TM

These simple tips have helped me to multitask, and made cooking meals more manageable. They allowed me to spend more quality time with the kids, instead of just putting them in front of a screen. I hope you will find them useful too.

Here are some of the dishes that I prepared, using the above tips.

Braised pork with egg and stir fried vegetables (chinese cabbage and broccoli)

1 Pork w egg  TM

Minced pork with button mushrooms and stir fried vegetables (cauliflower and snow peas)

2 Mince Pork  TM

Honey chicken wings with steamed broccoli

3 Honey chicken wings  TM

Stir fried lean pork with chinese cabbage and carrot

4 Sliced Pork  TM

Fried rice with edamame, diced pork, diced ‘lap cheong’ and egg

5 Fried Rice  TM

Stir fried diced pork with edamame and mushrooms

6 Edamame  TM

Cauliflower and tomato soup

6 Cauliflower soup  TM

Thank you for reading. If you have any cooking tips, do share!

**********

Thank you for reading. If you like this post, please do connect with me on Facebook, Instagram and Twitter, so I can share our fun adventures, thoughts and exploits with you. 

Friday, February 13, 2015

Edamame and Pork Pasta

Finally, the doc said yes. I can swim!!! It’s not difficult to imagine my joy. I mean, after being stuck at home for three months (one month of which was spent mostly in bed), going mostly only to the doctor and physiotherapist, and doing mostly gentle physiotherapist, it’s exciting to finally go into the water again. I felt delirious, to the point I think my kids thought I was crazy. It felt so good to be swimming with them again, to carry them and walk in the water. Yes, I can only do that in the water. 

Because we usually have swimming sessions in the mornings, there’s the big question of lunch. What can we have that’s simple and quick to prepare? Like EV likes to say lately, easy peasy lemon squeezy.

Ah ha.. a eureka moment for me. Edamame and Pork Pasta!

Edamame  pork pasta

Edamame and Pork Pasta
Serves 5

Ingredients
300g pasta of your choice, cooked
1 cup edamame beans, cooked and removed from the shell
200g pork, sliced
1 carrot, shredded
2 teaspoons light soya sauce
1 teaspoon sesame oil
½ teaspoon corn starch
Pepper
Butter or margarine
Olive oil

Instructions
1. The night before, cook and prepare the pasta and edamame beans. Marinate the pork with light soya sauce, sesame oil, corn starch and pepper. Leave the cooked pasta, edamame beans and marinated pork in the fridge overnight.
2. The next day, remove the pasta, edamame and pork from the fridge 10 to 15 minutes before cooking. Wash and shred the carrot.
3. In a pan, melt the butter or margarine. 
4. Fry the pork until half cooked, then put in the edamame and carrot. Put in the pasta and toss until well combined.
5. Add a dash of olive oil and the pasta is ready.

Quick, easy, and most importantly, it’s healthy. A delightfully light dish to have after a refreshing swim!

**********

Thank you for reading. If you like this post, please do connect with me on Facebook, Instagram and Twitter, so I can share our fun adventures, thoughts and exploits with you. 

Wednesday, February 04, 2015

Review + Giveaway: Restaurant Hoshigaoka

{Sponsored review}

I still remember lining up with my family, waiting for our turn to get into Restaurant Hoshigaoka at Shaw Centre. It was a memorable time, when things were so much simpler, when there were fewer Japanese restaurant chains. Restaurant Hoshigaoka was the go to place for decent Japanese cuisine for the family.

Hoshigaoka 8

And I'm glad that Restaurant Hoshigaoka has managed to retain its cosy family atmosphere till this day. We were invited to the SAFRA Toa Payoh outlet to try out the new refreshed menu. We were the first to arrive, and for a while, it seemed quiet on a Monday evening, but soon, we saw many families, local and foreign, come to have their dinner there. Restaurant Hoshigaoka has clearly not lost its family charm.

Hoshigaoka 2

Decor wise, light brown wood is the main highlight, and together with Japanese embellishments like sake caskets, masks and Japanese characters on dark wood, it's hard not to distinguish this as a Japanese restaurant. It gives a sense of tradition to a restaurant that was first opened in 1972.

The main focus though, has to be the food. After 40 years, how does the food fare?

Hoshigaoka 1

We had four mains and two kids' meals that day. The mains were: Mentai Potato Salad, Kurobuta Shabu Shabu, Goma Beef Houba Yaki and Hoshigaoka Zen. The kids' menu ($9.90 per set) is new.

Hoshigaoka 3

Both EV and AA chose the same kids' meal: Set D, which included a mini udon, omelette, deep fried prawn, cucumber roll and French fries. I think they chose it more for the aeroplane tableware. Though I was secretly hoping they would choose one of the other three as well, their choice was a good one, because they finished everything, including the jelly, Yakult and Hello Panda snack. You can imagine my happiness seeing them happily slurping their udon and biting into the ebi fry. I generally don't let them eat snacks, but just for that night, I made an exception.

Hoshigaoka 4

While the kids were being satisfied, the two adults were also gleefully digging into the mains. I personally liked the Mentai Potato Salad ($7.90). I mean, it's a salad right? So it must be healthy. Well, it is, with a generous serving of greens. But the potato salad topped with spicy cod roe mayonnaise and served with sesame dressing is quite a tasty combination and it's easy to keep having it over and over again. I think I suffered from too much calories that night. :)

Hoshigaoka 5

Sukiyaki, shabu shabu. Name it, I like it. The Kurobuta Shabu Shabu ($17.90) was great for that cool evening. Besides the flavourful broth made with shoyu, mirin, sake and fish stock, what gave the thin black pork slices that extra oomph was the dipping sauce. Its tangy, citrusy and mild spiciness comes from ponzu, spicy radish and spring onion slices. What I like about it is it comes with quite a lot of vegetables, toufu and mushroom, which is great with the soup, even after finishing the pork.

Hoshigaoka 6

Now one mustn't take too long to dig into the Goma Beef Houba Yaki ($16.90), which is slices of 30-day aged New Zealand Ribeye Beef grilled on a Japanese magnolia 'houba' leaf and marinated with sesame sauce and garlic. The beef must be eaten as soon as it is served for it to be extremely tender. Leave it to grill for too long (like what we did) and the meat will become overcooked, a shame to the beef as well as the flavourful marinate.

Hoshigaoka 7

The Hoshigaoka Zen ($32.00) is almost as old as Restaurant Hoshigaoka itself. It's a combination set of all the highlights of the restaurant, in mini sizes. This includes cold tofu with sesame sauce, sashimi, salmon sashimi salad, tempura, gindara teriyaki, beef misoyaki, rice, miso soup, chawanmushi and matcha ice cream. So if one really can't decide what to order, this well-balanced set should settle it. Though we might not be that satisfied with the sashimi; we wish there was more. Still, the tempura was done to the right crispness, and we were surprised by the tenderness of the beef misoyaki. The chawamushi was also cooked well, with little bubbles on the surface and just the right sweetness. No wonder the kids couldn't stop fighting over it. Even the matcha ice cream with red bean was a hit, with me and AA. DaddySay and EV both kept an arm's length from it. More for me and AA, I say.

While eating, we also checked out the other items on the menu, and found the prices quite reasonable. Coming back for another cosy dinner is something we look forward to. Perhaps, without the kids? :)

Giveaway!!!
Here's a chance for ONE winner to win ONE set of dining vouchers (for 2 set meals and 1 kids' meal) worth $43, thanks to Restaurant Hoshigaoka. Just follow the Rafflecopter instructions below. Remember, most are optional, but they do give you more chances to win. Good luck!

a Rafflecopter giveaway Terms and conditions:
- Entries that do not fulfill the requirements stated will be disqualified without notice.
- This giveaway is open to Singapore residents only.
- This giveaway starts on 4 February and ends on 13 February (inclusive) at midnight.
- The winner(s) will be chosen from a random draw of entries received in accordance with these Terms and conditions.
- The winner(s) will be announced on this post by 16 February.
- The winner(s) will be notified directly via email by the sponsor regarding collection of the prize(s).
- Toddly Mummy's responsibility will end once the winner's details are passed to the sponsor.
- Only one winner per household is allowed.
- The organisers accept no responsibility for entries that are lost, delayed, incomplete or cannot be delivered or entered for any technical or other reason.
- Entrants into the giveaway shall be deemed to have accepted these Terms and Conditions.
- Terms and conditions are subject to change without notice, at the organisers' sole discretion.
- This promotion is in no way sponsored, endorsed or administered by, or associated with Facebook.
- Participants are providing information to Toddly Mummy and the sponsor(s) of this giveaway and not to Facebook.

For more information, visit Restaurant Hoshigaoka's website.

Disclaimer: We received a meal sponsorship (for two adults and two children) from Restaurant Hoshigaoka for the purpose of this review. We also received a set of dining vouchers worth $43 for giveaway purposes. No monetary compensation was received. All images and opinions are my own, based on my family's experience.

**********

Thank you for reading. If you like this post, please do connect with me on Facebook, Instagram and Twitter, so I can share our fun adventures, thoughts and exploits with you. 

Friday, January 30, 2015

Honey Miso Chicken Wings

When you try a brand new recipe for the first time, it’s hard not to have mixed feelings. Firstly, you’re not sure how well it will turn out, or taste. And then there’s the question of reception. Will the family like it? Will this dish take a permanent place in the list of family must-haves?

Yesterday, I tried a new dish while having those exact feelings. The kids seemed to know I was doing something special; their sixth senses can be uncanny at times. That gave me more jitters. The greatest satisfaction was to have them like the new dish. No, not just like, but love it.  And boy, love it they did! Their verdict? They absolutely loved it, and wanted me to cook it again. Ahhh… the feeling of achievement couldn’t be more wonderful.

So what did I whip up? Honey Miso Chicken Wings, inspired by The Domestic Goddess Wannabe’s Garlic Miso Chicken. 

It was such a success, I just had to share it here.

Honey Miso Chicken Wings

Honey Miso Chicken Wings
Makes 10

Ingredients
10 chicken wings
3 tablespoons miso (I used organic white miso)
2 cloves garlic, minced finely
3 tablespoons honey
1 tablespoon light soy sauce
1 tablespoon water

Instructions
1. Wash and clean the chicken wings.
2. Mix the miso and minced garlic in a bowl. 
3. Rub 2/3 of the miso mixture on to the chicken.
4. Place the chicken wings into a container to marinate in the fridge. Marinate for as long as possible.
5. With the remaining miso mixture, add 2 tablespoons honey, light soy sauce and water. Mix thoroughly. Set aside.
6. About 2 to 3 hours before cooking, add the honey miso mixture to the chicken wings and place them back into the fridge.
7. Just before cooking, line a baking tray with aluminum foil, and preheat the oven at 200°C. Arrange the chicken on the foil.
8. Bake the chicken for about 20 to 25 minutes. 
9. Glaze the chicken with the remaining honey, and put it back into the oven for 3 to 5 minutes. Do keep a close eye.
10. The chicken wings are ready once they turn golden.

We had our chicken wings with rice and Baby Bak Choy with vermicelli soup. But really, it’s good with everything. I’m sure kids, and adults, will keep asking for it over and over again. 

Yes, I’m super proud of myself. You would too, if something you cooked for the first time met with such overwhelming response.

**********

Thank you for reading. If you like this post, please do connect with me on Facebook, Instagram and Twitter, so I can share our fun adventures, thoughts and exploits with you. 

Friday, November 07, 2014

Egg Dumplings

Dumplings are one of our favourite foods at home. From Shanghai Wontons to ‘shui gao’ (Cantonese for dumplings), we devour them all. Another of our family favourites is Egg Dumplings, a versatile food passed down from my grandmother, that can be used in soups and stews. It’s simple to make too, with only two basic ingredients. Although the cooking process may take a little longer, as each dumpling has to be made individually, the end product is really yummy, and in my opinion, worth the effort.

Ingredients (makes 15-18)
6 eggs, beaten and seasoned with light soya sauce
400g minced pork
Garlic, chopped
Red onions, chopped
Light soya sauce, sesame oil, corn flour and pepper to taste
Oil

Method
1. Marinate the minced pork with light soya sauce, sesame oil, corn flour and pepper. Leave for 15 to 30 minutes.
2. Put some oil into a frying pan and fry the garlic and onions until fragrant.
3. Add the minced pork and fry till half cooked. Remove the pork and set aside.
4. Make pork balls about the size of a twenty-cent coin.
5. Add more oil into the frying pan, put about two to three tablespoons of the egg mixture into the centre of the pan.
6. Add a pork ball to the centre of the egg mixture.

Egg Dumpling 1
7. When the egg mixture is half cooked, fold the egg into half to make a semi-circle, covering the pork ball completely.
8. Fry on both sides until lightly browned.
9. Continue steps 5 to 8 until all the egg mixture and minced pork are used.

Egg Dumpling 2
Once the dumplings are cooled, they can be used immediately, or kept in the fridge for up to two to three days. Whether it’s soup or stew, these egg dumplings can be quickly added to give the dish an added punch and bite.

The day I made this, which was several months ago, I used it for a Chinese Cabbage Vermicelli soup that was, well, souped up by the kids very quickly. Perhaps it’s also because I had simmered it with pork bones for a long time. I also like to think it’s because they like the egg dumplings too, a legacy that their great-grandmother left behind.

Egg Dumpling 3
Have you got a favourite food that is part of your family legacy? Do share!

**********

Thank you for reading. If you like this post, please do connect with me on Facebook, Instagram and Twitter, so I can share our fun adventures, thoughts and exploits with you. 

Friday, December 20, 2013

Egg Fried Rice with Ham - home cooked with love in 20 minutes

Another quick quick meal for the family last weekend. I was scratching my head wondering what to cook for dinner, as I wasn't in the mood for anything too complicated. Plus, it's the weekend and I was just feeling lazy. And so were the kids.

But they still needed to be fed, and the leftover rice in the fridge needed to be used, so…. Fried Rice! 

I used just 4 ingredients:
2 bowls cooked leftover rice
4 eggs, beaten, with a dash of fish sauce
5 slices honey baked ham (or any other ham of your liking), cut into square chunks
1 tsp chopped preserved radish

Method:
1. Heat some oil in a wok, on medium heat.
2. Add the preserved radish and fry until fragrant.
3. Add the rice, and give it a good toss.
4. Make a little dent in the middle of the rice, so that it resembles a 'donut', then pour the egg mixture over it.
5. Stir continuously, making sure that every grain of rice is covered with egg, until the egg is cooked. This may take up to 5 minutes.
6. When the egg is almost cooked, add the ham.

Egg 1

All done in 20 minutes. AA, my little 饭桶 (literally means 'rice bucket', or one who loves rice), asked for thirds and fourths, while EV, who usually prefers noodles, finished every grain on her plate. Tried and tested, this quick-to-cook dish has definitely won over their tastebuds. Until they next decide to surprise me by changing their tastes, that is, at which time I'll have to challenge myself to think of other ideas to cook fried rice. 

Do you have any to share?


**********

Thank you for reading. If you like this post, please do connect with me on Facebook, Instagram and Twitter, so I can share our fun adventures, thoughts and exploits with you. 

Lavsuca promo banner

Friday, December 13, 2013

Braised Pork Belly with Egg & Chinese Cabbage with Dried Scallops

With a busy day looking after the kids and doing the housework, preparing a tasty, sumptuous and easy dinner can be a challenge. Especially with two young demanding kids who constantly want your attention. Before the kids, I could prepare and cook at one go. Now, I need to multitask, and break the dishes I want to cook into smaller manageable tasks that I can do throughout the day. Something that most mums do, I'm sure.

Though busy and tiring, with one thing happening one after the other without stopping, like clockwork, I enjoy cooking for my family, and seeing their happy faces when their hungry tummies are filled. It's very satisfying, if you know what I mean.

Today, I'm sharing two dishes that fits the above criteria that I've listed, and which are some of my kids' favourite food - Braised Pork Belly with Egg and Chinese Cabbage with Dried Scallop. And I will focus on the various steps that I took, from the time I started preparing to the serving of the dishes at 6pm. Firstly, the ingredients needed for each dish:

Braised Pork Belly with Egg
500g pork belly
6 hard boiled eggs
3 tbsp light soya sauce
2 tbsp dark soya sauce
1 tbsp Hua Diao wine
1 tsp corn flour
1 tsp Five Spice powder
1/2 cup water

Chinese Cabbage with Dried Scallops
500g Chinese Cabbage
10g dried scallops
1 tbsp fish sauce
1/4 cup water

Step by step method and time
9am - Purchase the pork belly. If it's frozen, take it out of the freezer and defrost.

11am - While AA was having his nap, and DaddySay was playing with EV, I cut up the pork belly into strips and boiled the eggs. Then I seasoned the pork with the dark soya sauce, light soya sauce, wine, corn flour and Five Spice powder, and let the seasoning set in in the fridge. After the eggs are cooked, I set it aside to cool.

2pm - Peel the eggs and put it in the fridge along with the seasoning pork. Wash and cut the Chinese Cabbage into strips.

3pm - Start cooking the pork belly. First, sear the pork with the stove fire on high. Once all the pork is browned, pour in the water and turn the flame to low, and let it braise slowly. After about 45 minutes to one hour, carefully put in the hard boiled eggs, and leave it to simmer for about another hour, or until the eggs attain a nice brown colour.

530pm - Soak the dried scallops in water for about 15 minutes. Heat a wok with some oil and put in the scallops. Fry until fragrant, and put in the cabbage. Add the water, and let the cabbage simmer. Once they turn soft, add the fish sauce.

6pm - Serve both dishes with some hot fragrant rice. 

Belly 1

Cabbage 1

Simple home cooked fare that my whole family loved. That just makes me super happy. Now I can rest my tired head and body, provided the kids don't stir.


**********

Thank you for reading. If you like this post, please do connect with me on Facebook, Instagram and Twitter, so I can share our fun adventures, thoughts and exploits with you. 

Lavsuca promo banner

Thursday, November 14, 2013

Japanese Tamagoyaki

I love cooking food that my two kids love. For EV, it’s dishes that contain ham, mushrooms or cheese. For AA, he has developed a love for eggs, in different styles. As I discovered, he adores eggs done in the Japanese style the most – tamagoyaki, chawamushi as well as the fried eggs found in Oyako Don.

So the skills I learnt from Chef Takashi Nakaya at a Japanese cooking workshop comes in handy (Read about it here). I can now make him Japanese Tamagoyaki any time of the day. Though, the allure of eating tamagoyaki in a Japanese restaurant, taken off a moving belt, still appeals lots to him.

Here’s what you need to make a perfect Tamagoyaki. Usually, it is made using a special rectangular omelette pan, but a regular round frying pan can be used instead. The trick is in the rolling of the egg. 

Japanese Tamagoyaki (omelette)
Ingredients
3 eggs
2/3 tbsp soy sauce
2/3 tbsp sugar
2/3 tbsp mirin

Method
1. Beat eggs, add sugar, mirin and soy sauce. Mix well.
2. Add the ham and cheese and stir the mixture lightly.
3. Heat 2 tbsp oil in a pan on medium heat. Drain extra oil into a small bowl for later use.
4. Pour a tablespoon of the egg mixture, or enough to make a thin layer, in the pan. Cook until half done then gently roll the egg from one side of the pan to the other, folding the egg as you progress.
5. To help in the rolling, use a ladle and spoon together.

Tamagoyaki 1
6. Add more oil if necessary and spread over the pan. Pour another scoop of the egg mixture in the pan, tilting it so that the mixture flows under the rolled egg. Cook until half done and roll this egg layer over the previously rolled layer, moving in the opposite direction so that the omelette becomes thicker.

Tamagoyaki 2
7. Continue frying and rolling the layers, until all the egg mixture is used.
8. Cook the omelette on all sides until slightly browned. Serve.

Tamagoyaki 3
Here's the final dish - Japanese Tamagoyaki.

Tamagoyaki 4

Then I thought: why not add a twist to the Tamagoyaki by adding any ingredients to my family's liking.  Just for EV and AA, I added a little twist of my own, by adding some ham and cheese. 

And there you have it! A perfectly rolled Tamagoyaki, with ham and cheese. Enjoy!

Tamagoyaki 3

Linking up with:


This is part of a 'What's Cooking' blog train / party where, together with some blogger mummy friends, on the second week of each month (from Sept - Nov), we will be bringing you home recipes featuring different 'cuisines'.

Next up on this blog train is Jennifer Lim of DinoMama. A mother of one, she will be sharing with us the secrets of making a popular Japanese sponge cake using just a few ingredients


**********

Thank you for reading. If you like this post, please do connect with me on Facebook, Instagram and Twitter, so I can share our fun adventures, thoughts and exploits with you. 


Heart Studio Promo Dec banner

Tuesday, November 12, 2013

Peeling mushrooms

EV loves her mushrooms. Any type, any size. Just rice and a plate of fried mixed mushrooms is enough to satisfy her.

So one fine day, I got her to help peel the topmost layer off some fresh mushrooms. She was reluctant to do it at first, but she must have seen how much fun I was having, then she got into it very quickly.

Mushrooms 1

Sometimes, she needed some help in getting the stalks out nicely, but other than that, she did quite well.
She wanted to do more, but I didn't have any left for her. We practised counting with the mushrooms, and even made a little star.

Mushrooms 2

This activity is good for building practical life and fine motor skills.

**********
Thank you for reading. If you like this post, please do connect with me on Facebook, Instagram and Twitter, so I can share our fun adventures, thoughts and exploits with you. 


Heart Studio Promo Dec banner

Monday, October 14, 2013

Shanghainese Wontons

My mum's Shanghainese, and I've grown up eating many delicacies that Shanghainese cuisine is known for, such as braised bamboo shoots, stewed meatballs with vegetables, beancurd skin strips with Chinese ham and pork and Shanghainese rice dumplings, which are long not triangular in shape. Even hairy crabs are something that we would dig into every year, at home. Grandmummy would buy from her favourite Shanghainese shop in Causeway Bay (they lived in Hong Kong) and would estimate about two to three crabs for each adult, depending on the size. Then she would steam it at home, and at the dinner table, we will proceed to break and tear open the crabs ourselves. There's even a tradition of young children eating the legs first, before advancing to the main body when they get older. The whole meal would just be of crabs, maybe an additional vegetable dish, but nothing more. I've never eaten hairy crabs in a restaurant; it's just better and more appetizing to 'attack' the crab yourself, rather than letting the wait staff do it. And, nothing beats eating it in the comfort of your own home, with the company of family.

The other culinary tradition we have has to do with Shanghainese Wonton. When I was younger, Grandmummy, mum and sometimes my aunt would sit together at the table and make wontons, trays and trays of it. From a young age, I've joined this 'ladies group' and was taught how to make Shanghainese Wontons by Grandmummy, like how mum learnt to make it from her Grandmummy. I still can't wrap as fast as mum, but I like to think that my skills have improved over the years (though mum still sometimes nag that I either put too much filling, or don't close the wonton skin well).

So it's just a matter of time before EV gets assimilated into this. While we were making the wontons for this post, I was comforted by the sight of my mum showing EV how to make the wontons. EV's learning has started.

Shanghainese wonton 3
Making Shanghai Wontons is not difficult, but a bit of effort needs to be put in during the preparation stage. Here's our family recipe to share.

Shanghainese Wontons 
Ingredients (Makes 108 wontons)
6 packs of 250g wonton skin, from Yue Hwa Emporium Singapore
1.5kg xiao bai cai
500g pork mince
400g prawns, devein, peel and cut into 1cm pieces
3 tbsp light soya sauce
2 tbsp Hua Diao wine
2 tbsp sesame oil
1.5 tbsp cooking oil
1 tsp salt
A pot of pork bone stock
Sichuan vegetables, minced
Spring onions, chopped

When buying the wonton skin, you can choose from big size or small size. The size actually refers to the thickness of each individual skin. We got the big sized skin, and each pack contains about 18 skins.

Shanghainese wonton 6
Preparation - Vegetable & pork mince filling
1. Blanch the xiao bai cai in boiling water until cooked.
2. Chop the xiao bai cai into mince.
3. Squeeze the excess water from the chopped vegetables.
4. Add the cooking oil and salt, mix and and set aside.
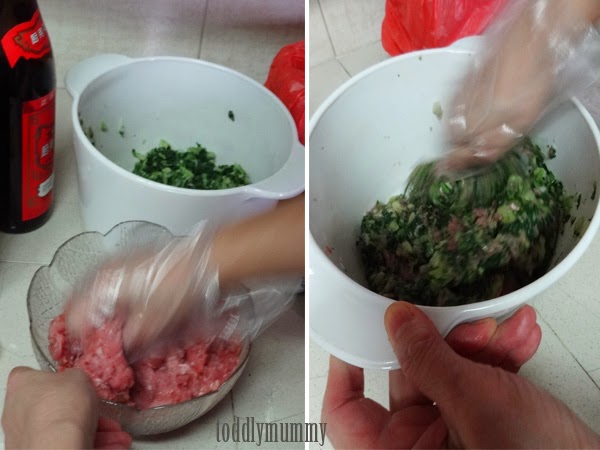
5. Add the light soya sauce, Hua Diao wine and sesame oil to the pork mince. Mix.
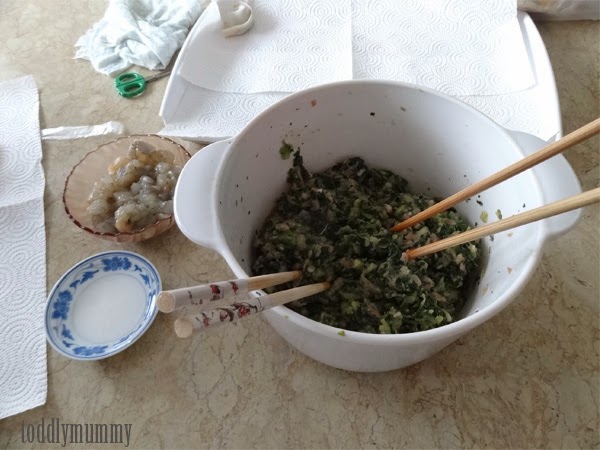
6. Combine the seasoned chopped vegetables and pork mince together and mix thoroughly.
7. Put the filling into the the fridge for about 15 to 30 mins.

Shanghainese wonton 1

Shanghainese wonton 2

Shanghainese wonton 4

Shanghainese wonton 5
Preparation - wrapping the wonton
1. Put a small amount of corn flour into a saucer and add some water. This mixture will help to seal the wontons.
2. Hold one wonton skin in one hand, and put the vegetable and pork mince filling, about the Size of a 20-cent coin, in the centre.
3. Add a slice of prawn.
4. Fold the wonton skin into half and gently press down around the filling to keep it from seeping out from the sides.
5. Gently fold into half again, twisting such that the two folded ends meet.
6. Dab a little of the corn flor mixture to seal the folded ends.
7. The wonton should look like an ingot.
8. Set it aside on a tray lined with paper towels, then proceed to make the next one.

Shanghainese wonton 8

Shanghainese wonton 7
Cooking the wonton
1. In a big pot of boiling water, put in the wontons, about 8 to 10 at a time.
2. Once the wontons floats up, or the skin becomes translucent, the wontons are cooked.
3. Use a strainer to scoop the wontons into a bowl.
4. Pour some of the pork bone stock, which has been prepared separately, over the wontons.
5. Add preserved mustard green and spring onions for that added punch.
6. Add fish sauce, light soya sauce or pepper to taste.

Shanghainese wonton 9

Shanghainese wonton 10
Ta da! A piping hot bowl of handmade, hand wrapped Shanghainese Wontons! Enjoy!

Shanghainese wonton 11

Linking up with:


This is part of a 'What's Cooking' blog train / party where, together with some blogger mummy friends, on the second week of each month (from Sept - Nov), we will be bringing you home recipes featuring different 'cuisines'.

Next up on this blog train is Alicia Tan of Beanie N Us!. A mother of one, she will be sharing with us the secrets of making Cantonese Soup. A traditional soup which has been passed down fromher mum's side of the family, this soup is both flavorful and nutritious. Black eye beans is the base ingredient here as it adds a smoky flavour to this chicken soup which is peppered with meaty mushrooms and slivers of abalone.


**************

Thank you for reading. If you like this post, please do connect with me on Facebook, Instagram and Twitter, so I can share our fun adventures, thoughts and exploits with you.